Thursday 28 July 2011

On the Go! Baby again: a giveaway and some free patterns for you

Do stop and join me for a little - you may read something to your advantage, as they say. You will have to bear with a bit of show and tell first, and then comes the exciting bit.


The absence of Princess Bunchy on an adventure has given me a teeny, tiny bit of time on my hands in between washing and ironing the bedlinen at our little cottage B&B (go on, come and stay - you know you will enjoy it!), and I find myself in a distinctly cushiony stage in my life. You may remember that last weekend I was having some fun with a great little gadget called a Go! Baby fabric cutter which the kind people at Accuquilt sent me to try out, and I made a patchwork cushion which the princess pounced on.


Well, her absence from by the side of my dear Rose has enabled me to make a cushion for myself (or rather for my sofa, as I would prefer not to be sat upon).  One of the dies I received with my Go! Baby cuts 4-inch quarter-square triangles, and came with a free pattern for an 8-inch hourglass block.


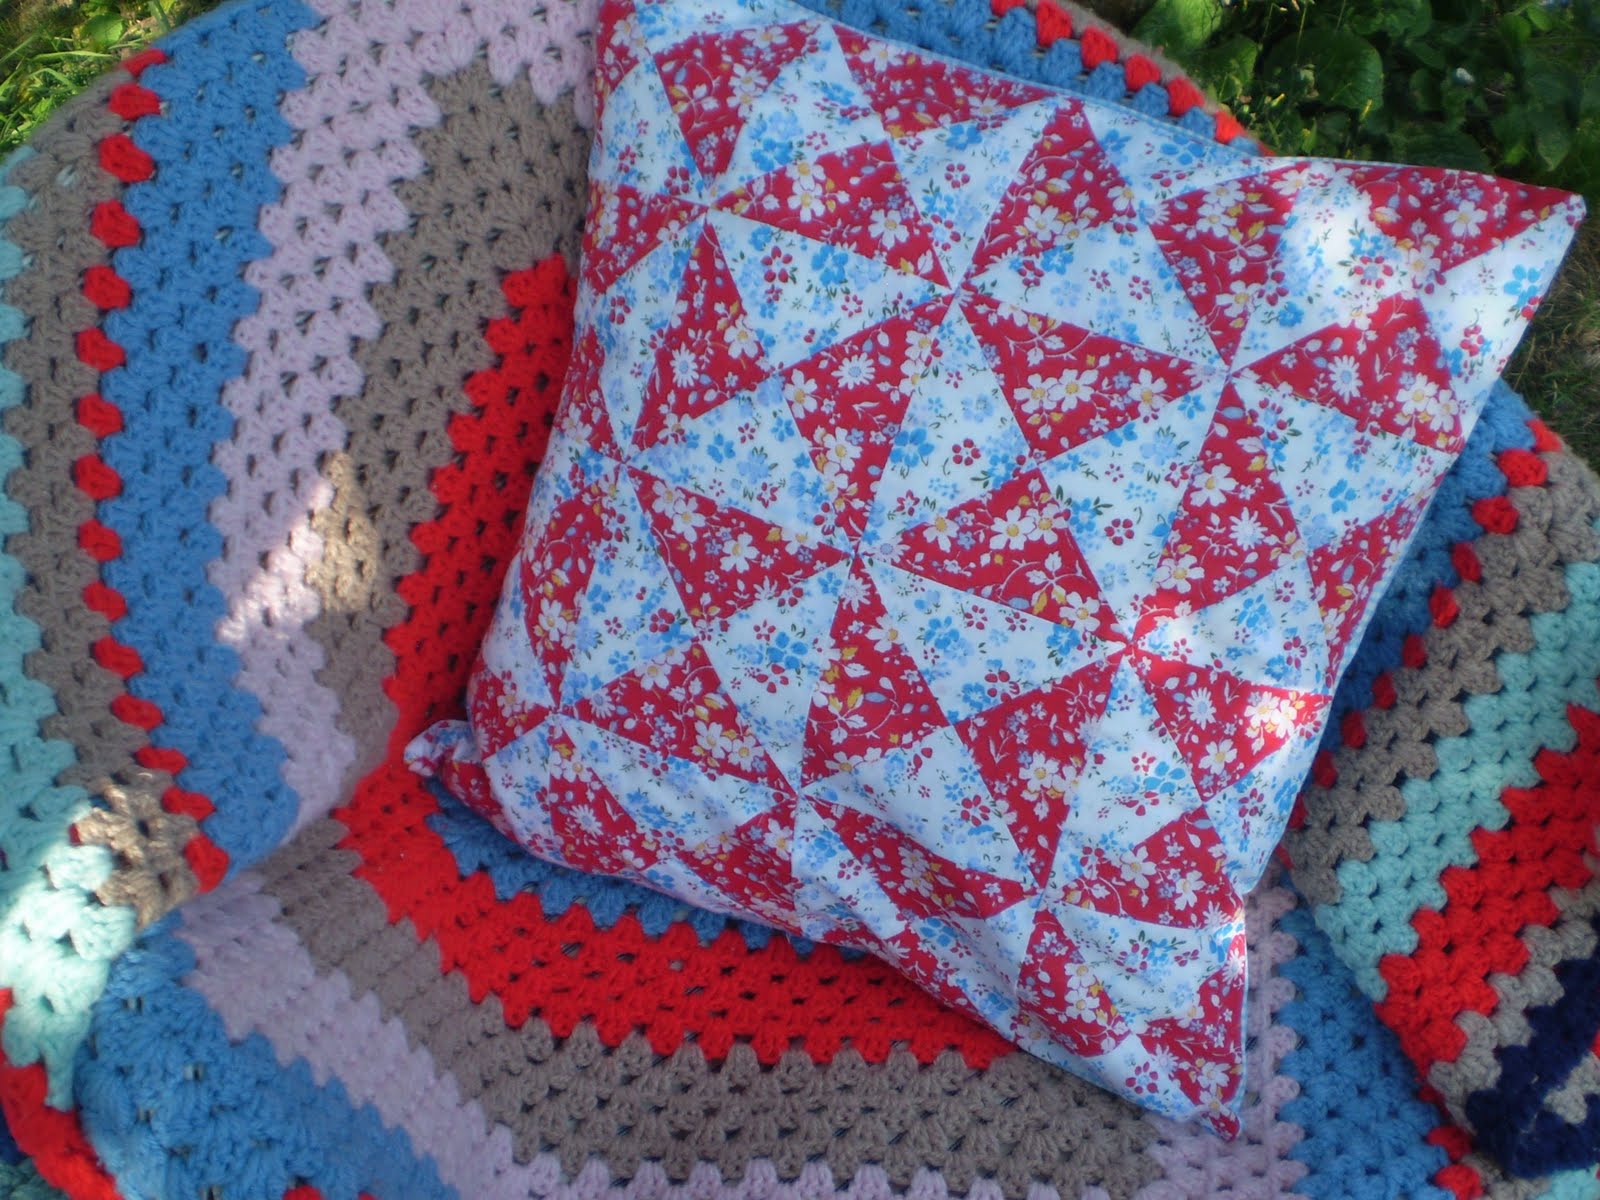
Four of these blocks very conveniently make a 16-inch square, perfect for a cushion - and what is even more perfect is that by fan-folding my fabric into four layers I could cut 32 triangles in one pass through the machine. So two passes through the cutter (one for each colour) and I had all 64 triangles for the cushion - and I think this is where the Go! Baby really does come into its own.


The fabric was two fat quarters from Leila's shop (and I had some left from each fat quarter), and then I backed the cushion with some blue check left over from the Dorothy dress. All those red triangles remind me of the kitten heels on those ruby slippers which were quite a task to find.


And don't tell the Head Chef, but today when I found myself ten minutes early for an appointment, and sauntered into my favourite sewing shop to, er, kill some time, in a fit of Go! Baby-induced cushion madness, I sauntered out of the shop again with three unconscionably tempting retro fabrics which would look oh so nice on my sofa (and would enable me to try out another of Accuquilt's free patterns which you can find if you click on the picture - you can download two PDF booklets for free).

22 Free Patterns - Download Now


Now for the really exciting bit: Accuquilt have very generously offered up a Go! Baby fabric cutter plus three dies and appropriate cutting mat, to be despatched to one of you, dear readers! (No, I can't quite believe it myself - a prize worth over $200.)

I will tell you how to enter, but first, and most importantly please, please, please make sure that you have an email address in your Blogger profile (on the top left of your Dashboard, click 'Edit Profile', make sure you have ticked the 'Show email address' box, and entered an email address). You will not get spam by doing this - I certainly don't. And it also means that I can reply to your comments - if I have never replied then you probably have not entered your email in your profile, and are thus a 'no-reply blogger'. For every giveaway I have done, 'no-reply bloggers' enter, and if I can't contact you by email then you can't win. If you are not on Blogger, just put your email address in the comment box.

And that is the end of the finger-wagging, now I will tell you what you have to do.

1a. You must be a Follower - you can start following now if you like.

1b. Go to the Accuquilt site here and pick out which three die cutters you would like if you win.

1c. Come back here and in the comment box tell me which cutters you have chosen.

These three steps will give you one chance to win.

2. If you would like a second entry, grab the photo below (Right click and save to your computer) and put it on your sidebar with a link back to this blog - come back and tell me you have done this.


3. For a third entry, do a blog post about the giveaway, and come back and tell me.

I will leave the giveaway open until the end of next week, and then see what exciting person I can find to do the draw - entries are open internationally, so wherever you are, do have a go! baby (sorry, I just couldn't resist that one . . . ).

Tuesday 26 July 2011

In a brown study: vintage granny home style

A little while ago, following a nudge from Ted and Bunny, I tripped over to the Vintage Bothy (aren't blog names wonderful? I feel that I could construct a complete narrative purely using the names of blogs, a whole parallel universe of imagination.) and the wheel of fortune was turning my way, because before long a most wonderful parcel of goodness came wheeling up to my door from the said Bothy. (In fact, I would like a Vintage Bothy at the bottom of my garden, inhabited by Ted and Bunny, who could sleep in the wonderful sleeping bags created by Flossie Teacakes, and we could have carpet picnics courtesy of Aunty Alice.)

A granny garden seat
Before I become completely parenthetical (can you tell that I have been reading To the Lighthouse?), I will tell you more about my big parcel, which put me into a total brown study for an afternoon. It contained a hexagon patchwork quilt in the making, a patchwork quilt fit for a vintage granny, and is the most wonderful example of how to make good, old-fashioned English hexagon patchwork, by hand and with card templates.


I am not sure how vintage or granny this patchwork is - and of course, how old is vintage? (Hen has been discussing the elasticity of the term 'vintage' on her blog.) It seems to me that 'vintage' is beginning to mean anything that is not brand new, but I have also come to the conclusion that I am decidedly vintage as I can remember a not inconsiderable part of the last century.


These hexagons speak 1970s to me - the '70s were definitely a very brown era. I had a brown carpet in my bedroom, cream and brown curtains, stripy duvet cover in shades of brown (except that they were called continental quilts when they arrived on these shores all those years ago); there was also a lot of that sludgy green colour, and the small floral prints have that Laura Ashley look which seems so familiar to me.


First, we have stacks of cut out fabric hexagon pieces, which will have been cut out using a cardboard template.


The next stage is to fold the fabric round a backing paper, and use tacking stitches to fasten it.


In this case the backing pieces are made from old Christmas cards in the best thrifty granny quilting tradition. My sister and I used to use the thick paper from glossy magazines such as Tatler, Vogue, and Harper's and Queen - the covers were particularly good, but even the pages were stiffer than your common or garden women's weeklies. There was one cardboard template for the fabric pieces, and another a quarter inch smaller all round (ie the finished size) for the backing papers.


The hexagons are then stitched together by oversewing - the oversewing is impossibly small in these rosettes, so the maker must either have been quite young, or started sewing at an early age. When I was doing my researches into nineteenth-century, I discovered that if girls had not learned to sew by the age of seven or eight, they could never achieve the really fine stitching required of a professional. (The same applied to knitting - if you didn't start young enough, you could never knit fast enough to make enough money.)


Here the hexagons have then been stitched into rosettes, some of which have been stitched together to make the quilt.


So this quilt has some stitched hexagons, some rosettes, and some of the rosettes have been stitched together to make part of a quilt - some hexagons have also had the backing papers removed. In the past, old letters were used as backing papers, and where they have not been removed they provide a tantalizingly fragmented window through which can be glimpsed a bygone world.


And this quilt in the making has a mystery all of its own. There are also half a dozen oval shapes using some of the same fabrics, although they are more uniform in design, and feature the more muted colours - but the ovals don't fit in with the way that the quilt has been pieced already, and I can't quite work out what the original plan was. Does anyone have any ideas on this one?


Tracey kindly included one or two other little goodies in her package to me - there was some very nice gardeners' soap which is now gracing my scullery sink, and the brown gingham made me feel positively sentimental.


All my children wore brown gingham 'blouses' (pronounced with a French accent) at their very first nursery school, and the sight of it took me right back down memory lane, past the bothy, over the hills and far away.

So if you want a home fit for a vintage granny, you need to dig out your old love letters, cut out a gross of hexie templates, pick some rustic coloured tiny floral prints fit for a milkmaid's frock, and sit on the sofa stitching as you ponder on the past.

And if the thought of all that labour with the scissors is all too much for you, drop by again, as I have a most enticing giveaway coming up, of which you will hear more very shortly.

Sunday 24 July 2011

Go, baby, go, go, go!

And go, go, go! is how it has been at our little cottage for the past couple of weeks, hence my absence from the wonderful world of Blogland. Lots of guests coming and going, a madman with lots of endnotes, and such a washing and ironing of sheets as only a B&B landlady could imagine (not to mention a washing and naming of clothes for a princess off on her adventures as you can only too well imagine - a princess who stopped by just long enough to wash off the smell of sheep and deposit her ruby slippers before embarking on manoeuvres once more).


But although I am a mamma bereft, all is not lost - I have had a wonderful new toy to play with which has gone some way to take my mind off the slings and arrows of maternal existence.


The very kind people at Accuquilt sent a rather nifty little number called a Go! Baby fabric cutter for me to try out, and to help me along was a book from Search Press written especially for Go! fabric cutters called Mix and Match Quilts with the Accuquilt Go! which has a dozen projects, and seems to me equally applicable to the Baby version of the cutter.


As one who started out in patchwork as a girl using a pair of not too sharp scissors and templates made from back copies of Harpers and Queen, and who only came to the wonders of rotary cutting a couple of years ago I was initially quite bemused by the idea that there was an alternative, but I have to say that after an afternoon's fabric fun, I am quite persuaded of its possibilities.

You might remember that here I told you how much I quailed at those quilt instructions which tell you to cut out, say, 200 quarter square triangles before you even thread your needle - well, this is where a Go! fabric cutter really comes into its own.

The mode of operation was pleasingly simple, and of much relief to me, as I am not of a mechanical turn of mind, and quite hopeless at interpreting those diagrams which tell you to fit part A into part B whilst simultaneously giving it a 90 degree turn anticlockwise whilst holding onto the antigravitational sprocket accessed via the impossible to locate transit bolt cover.


I just had to get my little Go! Baby out of its box, sit it on the table, and it was ready to use.


You choose the shape cutter (called a die) you want, put the piece of fabric on top, cover it with a plastic cutting mat, and slide it through the machine using a handle on the side to wind it through. 


No electricity, no confusion, and hey presto, lo and behold! Lots of little cut shapes coming out the other side.


Under the supervision of Princess Bunchy who was lying on the sofa a little indisposed, I made a cushion cover using a selection of small pieces of fabric lurking in my stash.


In keeping with my practice of making and memory I incorporated some small blue-flowered scraps left over from a skirt I stitched for the princess a year or two ago, and some matryoshka fabric she had chosen in the centre squares - one of these is deliberately made of two triangles to enhance the scrappy effect. Other fabrics are from Tanya Whelan, Jennifer Paganelli and Lecien.


I used a quilt pattern called Star Delight by Alex Anderson, which came free with the 4in quarter square triangle set, as my inspiration: four 8in blocks make a 16in/40cm square cushion cover. What I particularly liked is that you can cut 8 triangles per layer of fabric per pass through the cutter, and you can use up to 6 layers of fabric - which means that you can cut 48 of these triangles in one pass through the cutter, which is a real timesaver for a bed quilt. Equally, I used the Value die, which has three shapes, to cut just four 2 1/2in squares out using a small piece of fabric fanfolded into four and just big enough to cover the square, so there is no need to waste fabric if you want to cut fewer pieces.


This die also came with an hourglass pattern which I am going to use to make another cushion, and I have found a lot of inspiration in the Mix and Match Quilts book.


I really like the Garden Trellis quilt made from strips and pieced sashing, although I am slightly scared by the label 'Skill Level: Advanced', not being of the advanced type at all.


More comfortingly, the flowery Bursting into Bloom is marked 'Beginner'; the cutting dies are also available in all sorts of applique shapes such as these flowers, as well as the traditional geometric ones.

So my new toy will provide plenty to occupy me as my children come and go - the only potential difficulty will be in smuggling large quantities of fabric into the house as the postman cannot be guaranteed to arrive when the Head Chef is mowing the orchard or communing with his pigs. I do have a big cupboard which sits rather conveniently by the letterbox and front door, but that is somewhat of a yarn repository, and um, slightly compromised shall we say, in terms of space available . . .  I must go and read the Yarn Harlot again - she has lots of ideas about places to squirrel away stash. I seem to remember that she mentioned the piano - or was it a teapot . . . ?


Monday 11 July 2011

A sartorial emergency; or, how to make a Dorothy costume in a hurry

I hope that a nice weekend was had by all and sundry: I found myself in an emergency situation (not of the medical kind, thank goodness) when on Friday night a certain Princess informed me that she had decided that she and her black sheep were going to the agricultural show as Dorothy and Toto, and thus she would need a Dorothy dress and ruby slippers in a frighteningly short timeframe. Luckily I dissuaded her from going as Toto, and the sheep as Dorothy - a Dorothy dress for a sheep, or even a lamb, seemed utterly beyond my ken.

As time was of the essence, ordering in a Dorothy costume was out of the question. I thought I had the solution in a length of blue gingham left over from lining the Princess's crib in the last century, and McCall's 5458, which I made up in red homespun here. Skip the pockets, make the body in blue gingham, and the sleeves in white, and hey presto! Except the Princess is at the foal-like stage and there was no earthly chance of making a dress with a modicum of decency with only a metre and a half of fabric.

So off we went to the shops on Saturday, where in the first shop we found the perfect small blue check in Makower's Blue Gingham - except it was the end of a roll and only 1.6m ... Cue quick rethink: we decided on a skirt with bib and straps, and also bought two metres of red satin ribbon to tie round the neck of the sheep (I did struggle with how much ribbon is needed to encompass the neck of a very fluffy sheep, and erred on the generous side, just in case.)


Then the red shoes - oh dear, the red shoes! Thereby hangs a tale as long as your arm and back, involving a decidedly high-street shy mother and daughter visiting every single possible shoe emporium, and every possible emporium which might by a remote chance sell a pair of shoes that were remotely red, and remotely fitted a Princess with the most awkward feet, Cinderella-like in their slimness, and plum in the middle of every size interval known to man. My strength began to fail, and I was a-weary,  as I racked my brain for a solution to our dilemma.


So desperate did I become that I was begging my little Princess to wear shoes that did not fit, shoes that were truly uncomfortable, shoes with heels appallingly high for one of such tender years ... and finally as we entered the shop where we first started, where a pair of ruby red, kitten-heeled, excruciatingly uncomfortable-looking shoes, which I had rejected out of hand at the beginning of our outing, proved to be the most comfortable pair that a Princess had ever worn or set eyes on in all her born days - and so, dear readers, I bought them, on condition that the Princess took me straight to a coffee shop and fed me copious amounts of cake and intravenous caffeine, or failing that, half a scone and a latte, as long as I could go home and we never visited another shoe shop again, ever.


And then home to stitch, stitch, stitch - but luckily such was my dear girl's enthusiasm, she did a lot of the machining and some of the ironing, while I puzzled out how to make clothes without a pattern, which up until now has not been in Pomona's skillset.


 But she was very happy with the result - not entirely authentic, but surely up to the standards of the Young Farmers, although I am not sure how the shoes will go down, severely black and protective footwear being recommended for animal handlers.


For those who might be faced with such an emergency, I made a simple dirndl skirt - the Princess is svelte enough for one width of fabric to suffice (you will need one and a half to two times the hip measurement, so for bigger hips you would have two side seams, and two pieces of two-thirds width), which she stitched into a tube.


The length was calculated by measuring the length of skirt required, then adding on enough for a double fold narrow hem (say 1 inch, or 2 cm), plus enough for the elastic waistband casing, which is made by turning over and ironing about 0.7cm/1/4in, then turning over again by the width of the elastic (3/4 in/20mm in our case), plus a tiny bit extra to make threading the elastic easier.


So, first stitch along your side seam(s) to make a tube, then around the waist for your elastic casing, leaving a gap for threading, then turn up and stitch your narrow hem.


For the bib top, I cut a double thickness on the fold, 12in/30cm square (ie a rectangle 60x30cm/24x12in) - adjust this according to the size of child, which I did by holding the fabric against her body and folding until it looked right. Iron a 30cm/12in square of lightweight interfacing to the wrong side of one half of the rectangle, fold it in half right sides together and stitch the two sides. Trim the seams and turn right sides out.  We then folded the two open sides in by about 1cm/1/4in and ironed them.


For the straps we cut two long strips twice the final width of strap required, plus a seam allowance either side. This is best done on the body - we cut them extra long, and trimmed them to length at the end. Fold the straps right sides together, stitch along the long side, iron the seam open, then turn the long tubes right sides out, and iron flat positioning the seam along the middle back.

Then tuck the straps in the open bottom of the bib at the centre and fold back diagonally to leave the bib at the two top corners as in the picture, then pin in place. Topstitch the bottom of the bib closed, and topstitch the straps in place, along each side of each strap. We sewed buttons on the outside front of the skirt waistband, and buttonholes to match on the bottom two corners of the bib, working out the positions by pinning on the body. A large popper on the bottom centre inside of the bib fixes the centre to the skirt.


Then pass the straps over the shoulders and cross them at the back. They need to be quite tight to stay on - sew buttons at appropriate points on the inside of the skirt waistband, and make buttonholes in the straps - and hey presto! You just need a basket and a compliant dog (or sheep) and you have a Dorothy.


By making a detachable bib, it means that the outfit will have more than one life. We plan to reuse the skirt afterwards by shortening to a slightly more modern length by turning up a few cm and hemming, and removing the buttons to make a pretty summer skirt. We might even add a bit of ricrac or lace trim at this point.

The shirt was made using Simplicity 4206 (a sewing pattern for dummies like me!), and some white polycotton similar to school shirting, which I had been given some years ago, and never used. Be warned - this pattern comes out very small, so I made age 14 and added 4in/10cm to the body length, so that it could tuck in the skirt. By gathering tightly we achieved a puff sleeve effect.

So that's how I spent my weekend. I had dreamed of having fun with some fabric scraps and this lovely pattern, and perhaps completing another couple of Farmer's Wives, but never mind - a happy Princess in a Dorothy dress is enough to warm the cockles of anyone's heart, and easier to make than a Dorothy costume for a sheep, so I am thankful for small mercies.

Sunday 10 July 2011

Counting my blessings in hollyhocks

Hollyhocks are abounding in gardens all over Blogland and as they are one of my most favourite cottage garden flowers, I thought I would show you some pictures of the ones in my own little cottage garden, and look into the symbolism of them as well.

'How very worthy you may say', or even 'How interesting!' if you are of a polite and complaisant turn of mind. Well, unfortunately for me, in the language of flowers hollyhocks seem to be associated with female ambition, and we all know that in ancient lore, female ambition is very definitely Not a Good Thing, and associated with all sorts of dreadful ends for its proponents, so I decided to investigate no further. There are also hints of fertility in the mythology, too, and being a bit past that stage in my life, I just hugged my cardi tighter and tucked my vest in before venturing out into my little plot to take some photos in the grey morning light of an English summer.

Spot the laundry

Which photography is not as easy as you might think on a Sunday morning here in Arcadia, when the garden seems to be festooned with sleeping bags hanging out to dry, and yellow snakes of hosepipe out to trip you up, and those pesky blue bins which try to interpolate themselves into every picture (or possibly interpellate, but my academic days are gone, so I will not trudge down that semantic route).

Not far from a blue bin


The hollyhocks in my garden arrived with one small plant many moons ago, and have settled into a relatively small palette of colours ranging from pure white to palest pink. They move around at will, I am never sure quite where they will pop up from year to year, and I live in slight trepidation that one day they will forsake me entirely for pastures new.


Hollyhocks creeping in everywhere
In terms of cultivation, they seem to enjoy kerosene fumes, as the encampment by the boiler outlet grows tall and vigorous and seems to spread a little further every year, in spite of being against a north-facing wall.


Hollyhock in front of sewage treatment system

In a vaguely similar vein, a small hollyhock has crept in on the edge of the WET system, which treats the black and grey water emanating from the homestead - and no, a WET system doesn't smell; yes, it looks very pretty all year round, and provides a haven for wildlife, and for those of you worried about what you might see, what we euphemistically call the 'solids' are corralled in an underground tank (formerly the cesspool), there in the dark to rot away gently, out of sight and mind, before reaching the first of the five ponds.

Small hollyhock venturing further

Moving on from noxious gases and sewage (and I did so want this to be a pretty post, but there's hollyhocks for you, vaunting ambition, and a determination to get everywhere), I also have a memory of hollyhocks past, flowers dark as night, growing up through the cracks in the paving in the greenhouses belonging to the house of my dear-departed grandmamma. Those hollyhocks towered up above me when I was small, leaning over with a predatory and sinister air.  I feared their strange touch, and they were part of the trepidation I felt in venturing so far from the familiar and predictable safety of the house and the known and friendly part of the garden into a hot, dry world which smelled of dust, where birds flew frighteningly past my ears and hurled themselves at the enclosing glass. The hollyhocks lined and leaned over a path I had to negotiate anxiously to where it led into the dank darkness of the potting sheds, a rope- and clay-beridden gloom where a terrifying figure of a gardener might emerge at any moment from the shadows and speak incomprehensibly to me. But then came the light from the open door, and the kitchen garden, and the Commander-in-Chief and the scritch-scratch of his hoe, and carrier bag upon carrier bag of peas and beans to be shelled in the sunshine of the back step to the sound of the cricket on Radio 4.

Now those shadows are long gone, I regret that I didn't collect the seeds of those beautiful, eerie, night-dark flowers when I had the chance, but you can see pictures of something like on Marigold Jam's blog. And there are also hollyhocks of a beautiful clear pink that I covet on Millefeuilles (not to mention another beauty of the cardigan kind). I have one more little corner of beauty to share as part of the Bloggers' Garden Tour, my Carnation, Lily, Lily, Rose patch (the pinks are not in flower, and the rose seems to have slipped off the edge, but I am getting there).


This week I have received one of the loveliest compliments that I have ever received in my comments from Momof3girls, not to mention medical confirmation of the value of knitting to the psyche here. It has reminded me of the need to count our blessings and seize the day, and the importance of giving out blessings, too.

And in a week when great sadness has touched the lives of some dear people I know, I would urge you to count your blessings and seize the day, too. So as I go to take my own day into my hands, I hope you are enriched by yours ...

Thursday 7 July 2011

Knitting in the memories, stitch by stitch

Today I have a yarn to spin, a tale not of two socks, but socks in their multitudes, padding softly along the corridors of my mind.


I am happy to say that the orphan sock is orphan no more, and has a friend to play with, and the two of them have been warming my feet most delightfully as I sit slaving away at my desk.


When I took a photo for my project page on Ravelry, I noticed that the older of the pair had a distinctly dishevelled air and is somewhat bigger than its friend, possibly symptomatic of my sloppy state when I started knitting it last autumn. But taken as a pair, they do signify some progress on my part, and so the sight of them is encouraging enough for me enjoy wearing them in their lopsidedness.

Which led me onto the thought that although it is a commonplace to regard craft as a form of self-expression - we choose our patterns and colours according to our taste, and arrange our materials in pleasing ways so that our fabrications say something about how we see ourselves, in a quite deliberate way - for me, what I make seems quite unconsciously on my part to become a repository of memory and experience which is conjured back into existence when I take up that piece of my making on another occasion.


It might seem a bit pretentious to recall Wordsworth and his idea of poetry as 'emotion recollected in tranquillity' as I look at a slightly wonky sock, but I have come to the rather bizarre realization that this power of recollection is why I love sock knitting so much. Socks are so easy to knit, so portable, and I can almost remember my favourite pattern off by heart now, so I knit socks in the midst of family life, and thus with every stitch they accrete memory and emotion and feeling and seemingly of their own accord they gain a symbolic power which just doesn't happen for me with cardigans.


So I have a pair of Accidental Socks - the first pair begun in A&E on a Friday night when the Ploughboy had had an unfortunate encounter which led us there - I remember the bad light and distraction which led me to knit the cuff in a horribly mean single rib, and the sense of our being in the midst of a multitude of human tragedies, large and small.


I found myself knitting the second on another weekend evening with another son on another late night visit to a hospital. This time the corridors seemed empty but the light was of the same sickly and overcast hue, and the memories stay strong because of the socks.


And then there are my favourites: my Brittany socks,


which in their colours capture the intense blue sky and sea and sunshine of a Breton early summer,


the pale sand and stones and shells,


the happiness of returning to a favourite place after a too-long absence, and finding it unchanged, like an old friend.


And the retrospective poignancy of that time only a year ago when a little princess was still a little girl,


and somehow in the revisiting of the scenes of former family holidays,


and the knitting of those socks on the beach, I find contained in them a series of happy memories of seas and skies and cathedrals, a cornucopia of past joy, which sends my heart soaring.


Those stitches going round and round keep my feet cosy and my heart warm, and once again I think back to those Romantic poets: Blake seeing a world in a grain of sand, and holding infinity in the palm of his hand ...


... and I think about knitting socks. I can meditate and be mindful, I can be a present and attentive (relatively speaking) mother and wife, I can make productive use of my time, and then every time I pull one of those socks from my drawer, like a rabbit out of a hat, those memories come tumbling out to make me smile and weep, and relive them once again.

I have just cast on another pair - Skein Queen Squash in Electric Lime, 64 stitches going round and round: I wonder where those stitches will take me, and what memories they will contain?

LinkWithin

Related Posts with Thumbnails